💧 Final Project

Ng Mei Ying (0340563)
Film Studies & Cinematography
Final Project: 20s Animation Teaser (30% Individual)
Feedback:
INSTRUCTION
📌Final Project: 20s Animation Teaser
(Week 9) 28/05/21
For the final project, the Animation Fundamentals and Film Studies modules will share the same final project --- 20 seconds Animation Teaser. Students are required to start their planning for the 5 animatics shots are chosen from the storyboard thumbnail and produce a fully rendered animation teaser with sound.
✦ Animatics Scene Selection
This week, I need to decide on choosing the 5 shots for the 20s animation teaser production. However, I found it hard to decide upon the animation shots after Mr Martin's class as I'm still unsure of which shots can fulfil the module requirements better. Hence, I decided to get some further opinions and suggestions from Ms Jen that could help me to have a better vision to chose the 5 shots.
Feedback: Ms Jen: "Most of them seem to depict the storyline nicely, more so with your stylized visuals and the character has good expressions so far. The camera angles are pretty simple and most of the scenes showed clear shots for the story, though you might want to lessen the idea of using montage in your scenes (which I wrote to you in WS), in storyboarding, sometimes it's not good to keep using the same kind of angle over and over as it'll look repetitive and cliche, in some terms, they call it shot abuse. But overall all looks good."
After getting some suggestions from Ms Jen, I removed (fig 1.5 scene 6) from my chosen animatics shots as I would like to keep the ending scene in the full-length animation short instead of revealing it in the teaser.
 |
| Fig 1.0 Recommended Teaser Scene 1 (can be part of the opening) |
 |
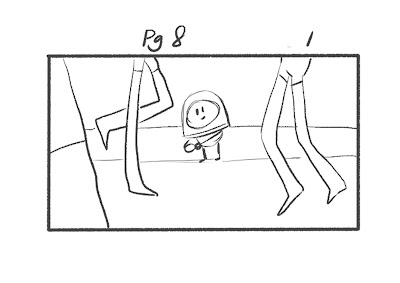
| Fig 1.1 Recommended Teaser Scene 2 (introduces the protagonist's relation to her parent.) |
 |
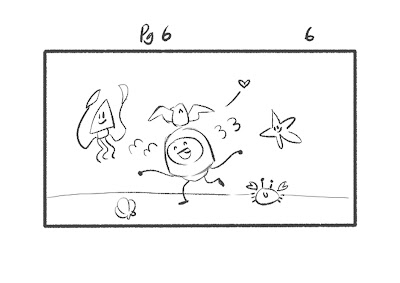
| Fig 1.2 Recommended Teaser Scene 3 (shows her imaginative happy moment) |
 |
| Fig 1.3 Recommended Teaser Scene 4 (shows her reaction while realizing she's lost) |
 |
| Fig 1.4 Recommended Teaser Scene 5 (shows the consequences of her action, perhaps) |
 |
| Fig 1.5 Recommended Teaser Scene 6 (shows that her parents are always there for her) |
(Week 10) 02/06/21
✦ Animatics (ver.1)
Below was the first animatics video for my original animation short story "Attention". 5 potential shots had been chosen to create animatics after getting a consultation with Ms Jennifer before the end of week 9.
YouTube link: SEM 4 FSC - Animatics Draft 01 (Ng Mei Ying 0340563)
Feedback: Mr Martin mentioned several things as shown below:
- (Shot 1) the walking speed is too fast, should make it at least 4 seconds to establish a better opening scene. There will be a total of 5 seconds for the whole opening shots including the 1 second for the starting shot of the sky.
- The sequence of the shot showing the character separated from her parent is lacking a visual impact. A recommendation was given to make this scene a connected scene after the character screaming shot.
- The transformation shot scene showing the seashell turns evil should need more time to complete the transformation process for a key emotion of horror for the character. A recommendation was given to have 2-5 seconds for this scene.
- Lastly, having the medium close up shot of the character's reaction and zoom out to show the wide shot of the environment would be an ideal ending scene.
(Week 11) 07/06/21
✦ Animatics (ver.2)
Below was the latest animatics video with some refinement for my original animation short story "Attention" after getting the feedback from Mr Martin. The sequence, as well as the video duration, had undergone some adjustments to ensure that the intention of the story was portrayed well.
YouTube link: SEM 4 FSC - Animatics Draft 02 (Ng Mei Ying 0340563)
Feedback: Mr Martin mentioned students don't need to focus too much to ensure the story flow and sequence for animatics including the final teaser animation as well. this is because the students don't need to create an animation teaser that could tell a complete story although the lecturer names the final project "the animatics/teaser animation". The student just needs to choose 5 shots from the storyboard thumbnails and develop the still image into the moving scene with the cinematography and animation fundamentals knowledge and skill applied. Hence, it's not necessary to have a cutting sequence fr shot 4 and 5 to ensure the story flows well (I could still do it in that way if I wanted to).
- For the opening scene, draw the coconut trees taller
- For shot 1, make the character left her shoe behind and she did back and pick it
(to carry a foreshadow of the story development due to the missing shoe) - No worries for the animation story cus & effect, no continuous story
- Look for a minimum key-frame shot for a maximum outcome
(ask for Ms Jen guidance)
(Week 12) 14/06/21
✦ Scene 1 - Background & Sub-Character Design
To start with the background and the sub-character design for the first scene, I reuse the sketches I've done for the animatics as a guide for illustration. Based on the art direction, the background design will adopt a traditional organic hand-drawn art style meanwhile the character will adopt a 2D vector art style. This is because the juxtaposition of two different design methods will produce an interesting contrast between perfection and imperfection. To achieve this design idea, I illustrate the background design using Adobe Photoshop and create the sub-character using Adobe Animate.
 |
| Fig 4.0 Shot 1 (idea sketch) |
 |
| Fig 4.1 Shot 1 Background Design (final) |
 |
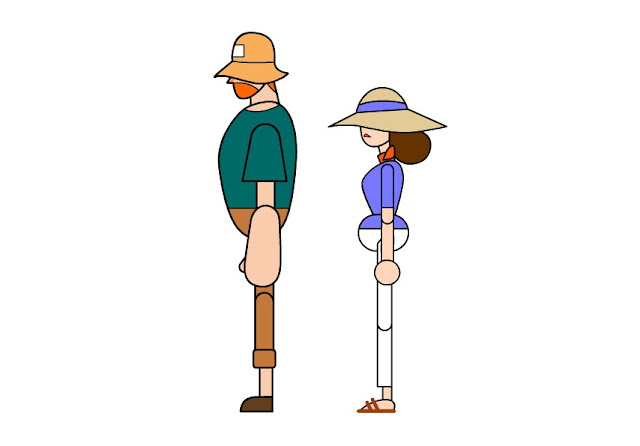
| Fig 4.3 Sub-Character (design process in Adobe Animate) |
 |
| Fig 4.4 Sub-Character Design (final) |
Feedback:
- Ms Jen mentioned that: "The environment design is colourful and there's no big issue with the colour scheme. Don't worry too much about the inconsistency of line thickness as it will be called as "a kind of art style" in the 2D animation industry sometimes. However, you can still adjust the line thickness if you got time as you should focus on the animation work right now."
- Mr Martin mentioned that: "The background art is very nice and interesting. You need to consider adding footprint and shadow for the walking character later to ensure they look more believable. It's fine that either the character is walking horizontally or diagonally."
✦ Scene 1 - Draft & Complete Animation
While I was working on the vertical parallax camera movement for shot 1, I found it's very challenging to adjust the motion speed in order to ensure the movement speed for the parallax background is evenly adjusted. Sometimes I found the frontier background layer move too slowly to overlap with the other background layer at the end of the shot. Another challenge would be the walk cycles for 3 characters at the same time. This is because each of the characters had different lengths in their legs. Syncing the characters walking distance by adjusting their walking speed was indeed a time-consuming process.
 |
| Fig 4.5 Shot 1 animating process in Adobe Animate |
YouTube link: 20s Animation - Scene 1 - Version 1
YouTube link: 20s Animation - Scene 1 - Version 2
Feedback:
- Ms Jen mentioned that: "You did not show this animation shot for me before, glad that you have done it! The animation looks nice and subtle. Overall, it looks good."
- Mr Martin mentioned that: "The animation for scene 1 seems to be a little slow... Maybe is an internet issue, you can email the video for me to have a real time quick view. The overall design including the environment illustration is beautiful. The character movement is natural."
(Week 13) 21/06/21
✦ Scene 2,3,4 - Background Design
This week, I continue to design the background scene for shots 2, 3 and 4. To draw efficiently, I use back the same coconut tree for shot 2 (fig 4.6) background design in different layers. Moreover, I applied a creamy colour scheme for shot 3 (fig 4.7) background design to create a dreamy effect, and this will be the scene where the protagonist slips into her imagination. Shot 4 (fig 4.8) will be the background for the moment when the creatures transform into monsters. To create a visual illusion with a sense of perspective, vertical dots are scattered in a smooth gradient tone.
 |
| Fig 4.6 Shot 2 Background Design (final) |
 |
| Fig 4.7 Shot 3 Background Design (final) |
 |
| Fig 4.8 Shot 4 Background Design (final) |
✦ Scene 3,4 - Creatures Design
Below is the design of the final creatures which will be encountered by the protagonist from shots 3 to 5. The different colour tone is applied for each of the creatures designs to create visual contrast & visual harmony.
 |
| Fig 4.9 Seabird Design (final) |
 |
| Fig 4.10 Fish Design (final) |
 |
| Fig 4.11 Seashell Design (final) |
 |
| Fig 4.12 Crab Design (final) |
 |
| Fig 4.13 Starfish Design (final) |
 |
| Fig 4.14 Monster Seashell Design (final) |
 |
| Fig 4.15 Monster Starfish Design (final) |
✦ Scene 2 - Draft & Complete Animation
Different from the first shot, the second shot adopts a horizontal parallax camera shot, which means the background will be arranged into multiple layers and animate horizontally. At the same time, the walking character will be staying in the same position (only the background is moving to create a visual illusion that feels like the character is walking forward).
 |
| Fig 5.0 Shot 2 animating process in Adobe Animate |
YouTube link: 20s Animation - Scene 2 - Version 1
YouTube link: 20s Animation - Scene 2 - Version 2
Feedback:
- Ms Jen mentioned that: "There's some movement issue with the kid's hand holding her mom's. The movement of the palm should be attached at the same position whereas only the elbow will have a subtle movement that follows the body."
- Mr Martin mentioned that: "The characters animation is good and the movement is mostly on point. You can exaggerate the poses for the kid a little more. (subjective comment: make the kid's chest tilt up a bit with the body bend forward a little more.) The shadow needs to soften a bit."
(Week 14) 28/06/21
✦ Scene 5 - Background Design
This week, I proceed to design the final background for shot 5. Below is the screenshot of five complete background illustrations in Photoshop. During the whole drawing process, I needed to keep the art style as consistent as possible. When I did not finish all of the background drawing in a short timeframe, it could be a little difficult to maintain a consistent style because I may have forgotten how I (created that drawing effect) got there in the first place.
 |
| Fig 6.0 Completed background design for 5 chosen shots in Ps |
✦ Shot 3 & 4 - Complete Animation
The process of creating the animation for shots 3 and 4 is way faster and smoother than I thought this time as I can reuse the layer setting including the present and the symbol settings I've done in the previous two shots. I'm glad that I have become more familiar and confident with the workflow using Adobe Animate to create a 2D drawing and animation. Ms Jen had once being worried that I will run out of time to complete all scenes before the presentation day. To avoid this situation happens to me, I rescheduled and rearrange my task load in order to work efficiently.
 |
| Fig 7.0 Shot 3 key-poses drawing process in Animate cc |
 |
| Fig 7.1 Shot 3 animating process in Animate cc (onion skin mode) |
 |
| Fig 7.3 Shot 4 creatures animating process in Animate cc (onion skin mode) |
Feedback:
- Ms Jen mentioned that: "(For Shot 3) The key poses is interesting, but to remember to clean up the unnecessary lines after completing the scene. I's normal to take more time to animate a shot with multiple characters at the same time. However, you also need to ensure to arrange reasonable amount of time to work on the rest of the shots."
(Week 15) 05/07/21
✦ Scene 5 - Draft & Complete Animation
This week, I continue to animate the last scene in adobe animate. I hope I could complete this shot earlier so that I could have more time to prepare the presentation slides. The draft shot 5 is a little short and the screaming scene is not established well, therefore the complete shot 5 have a longer pause on the protagonist screaming facial expression.
 |
| Fig 8.0 Shot 4 character animating process in Animate cc (onion skin mode) |
✦ Final Project Presentation (AF & FSC)
On this Wednesday 8am - 10am, the lecturers required students to present their progression for the final project. Students will present their slides briefly about the story, the design process and their learning notes and experience. Besides, I think it's a splendid chance to look at other animation work as students often having an individual consultation session in the Animation module.
Fig 9.0 Final Project Presentation Slide
Feedback: Mr Martin mentioned I was definitely meeting the requirements for both modules. The knowledge of film studies and cinematography is well applied in the animation teaser. Overall, is pleasant work but the protagonist looks a bit huge in the last shot as the protagonist seems to be larger than the surrounding crowds. Ms Jen pointed out that the overall character movement is good. The animation principle is well applied in most cases. It's a great job.
✦ Animation 5 Shots Compositing (for submission)
After getting feedback from both lecturers from the presentation session, I work on the sound effect and visual adjustment for the animation teaser. I'm happy that I have finally done the 2D animation in this insane busy semester. Although there's still room for improvement, I find 2D animation can be very fun to learn! Can't wait to learn 2D motion graphics in the coming semester!
Fig 10.0 YouTube link: SEM 4 FSC & AF - Final Project (Ng Mei Ying 0340563)


Comments
Post a Comment