01/10/21 - 06/12/21 (Week 6 - Week 15) NG MEI YING (0340563)
Advanced Animation
Project 1: Pre-Production (20% Individual)
Project 2: Production (20% Individual)
Project Final: Production (30% Individual)
Project 1: Pre-Production
W6 Animation Audio Research
In this week, students are tasked to produce and manage an animation project individually by using relevant programs and software to execute several tasks including searching for animation audio, character and props design, Storyboard and animatic. Besides, our lecture also gave us an option to use a pre-rigged character template or model assets available from the open-source website as a backup plan if we were unable to complete the modelling on time. However, students should put more effort into the animation result if we opt to use a pre-made character/model template.
Moreover, our lecturer recommended us many good resources to study character animation and also to pick suitable audio for animation. I had searched for several voice-over audios for my final animation project, and I was unsure of which audio would be the best fit. After careful consideration, I decided to go for the animation audio from the latest Disney animation movie --- "RAYA".
After comparing two scenes audio cur, I decided to use audio version 2 as it only involves one character in the scene and it's easier for me to work with. I proceed to edit the audio in Adobe Audition by adding some twists on the audio pitch level.
Video cutting in Premiere Pro
Audio Editing in Adobe Audition
Audio Editing in Adobe Audition
# Consultation Note: The audio selected is usable, but you need to tweak the story settings without being affected by the original movie too much. You can change the environment scene and increase the number of activities like walking, jumping scenes to showcase your animating skill.
W7Character Design + Storyboard Thumbnails
Character Design Research
After confirming the animation audio, the next step to do is to plan for the character design. I did some research for the character design based on the storyline and persona. while collecting reference images, I could visualise the character look and characteristics that fit the audio well. I hope that my character design would be having a stylised body archetype that resembles the character in the Disney Luca animation. for the consideration of reducing the animation difficulties, I plan to design tight clothing with stylised hair for the character.
Character Design Moodboard
Character Design Model sheet
# Consultation Note: Mr Kannan was fine with the character design and I could proceed to create the thumbnails storyboard sketches by next week. Mr Kannan suggest that I could consider adding on some accessories such as a hat to add more persona for the character.
Storyboard Thumbnails Drawing - Stage 1
I was once again lost my direction to create a storyboard as I was unsure how the actual character acting should be like at the very beginning. I had several ideas in my mind however I was not afraid to draw them out exactly as my current animating skills might not allow me to complete what I intended to achieve. Below is the storyboard development to reach the final version.
Storyboard Thumbnail (Ver.01)
Storyboard Thumbnail (Ver.02 / Part 1)
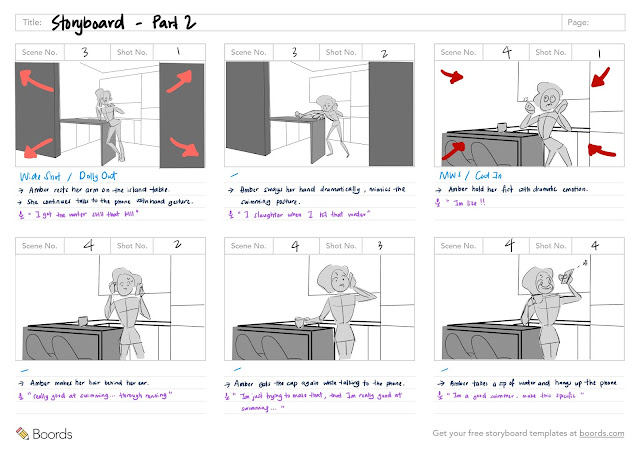
Storyboard Thumbnail (Ver.02 / Part 2)
# Consultation Note: Scene 2 shot 1: this part can be animated as an imagination scene, you can add on sparkling transition effects and make the character very confident and narcissistic in this scene. You can continue to transform the next scene into a scene that showcases the charter swimming skill as well. Following next will be the transition scene again, this time can just make use of the character hand animation to do the transition based on this dialogue "I slaughter...".
Storyboard Thumbnails Drawing - Stage 2
Storyboard Thumbnail (Ver.03 / Part 1)
Storyboard Thumbnail (Ver.03 / Part 2)
# Consultation Note: The final storyboard looks fine at the moment, and the next thing to do is to plan the action to get a nice flow of key poses by deciding what move first and what move next. You need to get the pose to pose action correct with the application of momentum /anticipation. It's normal that the character action will look rigid at the beginning as all actions movie at the same pace. Next, you need to add follow-through action (offset action) and ease in / out. Finally, you'll do the action cleaning.
W8Character Modelling
During this independent learning week, students are tasked to focus on character modelling and assets preparation. Last week, Mr Kannan taught us the easiest way to do character modelling and additional learning videos had been shared with us as a supportive learning resource. Based on the tutorial learning, I started to collect and pick suitable references for topology study. I found character modelling in MAYA could be a tedious task, yet I hope that I could grab this chance to try to model my own character.
Topology Reference Study
Modelling Part 1: start from the eye
Modelling Part 2: get the shape of the face
Modelling Part 3: the face model blocking
Modelling Part 3: final face model blocking
Modelling Part 4: hand & fingers modelling
Modelling Part 5: body modelling
W9 Acting Reference + Animatics
This week, students needed to proceed to take a video shot of themselves as the reference for our animation project. To get a better angle, I need to use a tripod to hold my phone during the shooting. The shooting was full of uncertainty as I had no experience in acting. The first session of video shooting wasn't that successful as I found my acting was too boring. After several shooting attempts, I finally got some fine video references for my animation project.
# Consultation Note: The acting video reference is fine and you got the acting skill there. For the animatics, the story flow and the camera shots are there. You can do mixed media animating clips, can be 2D animation or motion graphic or even stickman for the imagination scene. Be as creative as you can and the door of freedom is open to you. Moreover, can add a fade in the title scene at the beginning of the scene. Ensure to exaggerate the action and emotion while animating the character.
Project 2: Production
W10 - W12 Assets Preparation + Blocking
Moving on to this week, students needed to finalise their assets preparation and start animation blocking. I planned to create my own character modelling and rig at the start, however, I could not complete the character modelling and rig on time due to some technical issues. Due to the consideration that the character rig might not work properly and it might cause even more issues for my animation task, I decided to use the backup character template created by Artem Dubina. I double-check on the character rig in Maya to ensure it's suitable for the actual animation, then I proceed to do the character animation blocking with the environment model. It had taken me quite some time to search for a suitable kitchen model set for the scene and the first animation blocking outcome was just fine.
Character rig testing in Maya
Character animation blocking scene in Maya
Character animation blocking outcome (Playblast render):
Scene 01 / Animation Blocking (Ver.1)
Scene 01 / Animation Blocking (Ver.2)
Scene 02 / Animation Blocking (Ver.1)
Scene 02 / Animation Blocking (Ver.2)
Scene 03 / Animation Blocking (Ver.1)
Scene 03 / Animation Blocking (Ver.2)
Scene 04 / Animation Blocking (Ver.1)
Scene 04 / Animation Blocking (Ver.2)
Scene 05 / Animation Blocking (Ver.1)
Scene 05 / Animation Blocking (Ver.2)
Scene 06 / Animation Blocking (Ver.1)
Scene 07 / Animation Blocking (Ver.1)
Scene 08 / Animation Blocking (Ver.1)
# Consultation Note: Mr Kannan: There is too many scenes division for the least 3 scenes, can just combine scenes 6, 7 and 8 together as one whole scene. On the other hand, be careful of the character animation timing as well, because some part is going too fast and the viewer is not given sufficient time to capture the action.
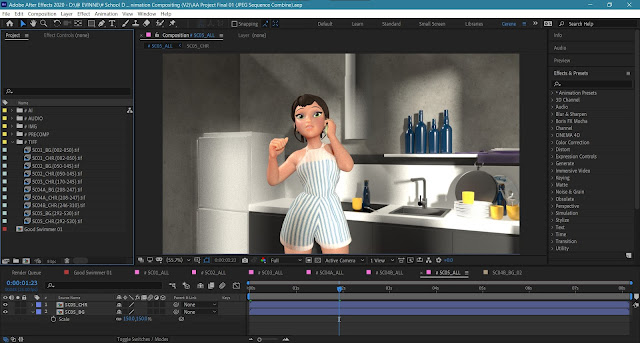
W12 - W14 Assign Materials + Animation Refinement
In these particular weeks, I continue to refine the character animation at the same time assign new materials for the kitchen furniture. I also did some UV wrapping for the floating rock as well. On the other hand, there were a lot of technical issues that started to occur these weeks which included the camera clipping, character meshes distortion during setting keyframe, shadow rendering etc... Having the character mesh distortion during the setting keyframe was the most frustrating issue as I could not preview the proper character animation in Maya and it will directly affect the playblast render outcome as well... It was very challenging as I still didn't find out an effective way to avoid these technical issues, and it ended up I had to guess the character animation frame by frame...
Apply Materials & UV Mapping
Assign materials for the environment & props
Floating rock UV mapping (part 1)
Floating rock UV mapping (part 2)
Floating rock UV mapping (part 3)
Import Png image plane for water waves
Character Animation Refined Outcome (Playblast Render):
Scene 01 / Refined Animation Playblast Render
Scene 02 / Refined Animation Playblast Render
Scene 03 / Refined Animation Playblast Render
Scene 04 / Refined Animation Playblast Render
Scene 05 / Refined Animation Playblast Render
# Consultation Note: Mr Kannan: You may not have enough time to revise the character animation but the following feedback was given for your future improvement. You need to ensure the character animation was clean as adding too much unnecessary movement will make the animation looks messy and chaotic. For the swimming scene, you needed to put more time to study how would the human body interact with water tension when they dive into the water. Consider making the character swim in a horizontal straight line instead of moving upwards and adjust the swimming pose a little more. Changing the underwater background into a simple gradient colour would be better as the current version looked confusing (the current water background looked like smoke instead of water). Lastly, try your best to render the full animation and the worst case is to submit a playblast render.
# Reflection: I was the only student joining the last consultation session on week 14, it was my best time to reflect on the doubts and technical issues I had encountered while working with Maya. As usual, I had asked my lecturer many questions and I really appreciate my lecturer for being very understanding and encouraging. (Working with Maya alone and searching for the solution on youtube was not easy as they looked pretty strange and confusing to me.) I understand that I still lack a lot in many perspectives in 3D animation, and I hope that at least I can try my very best to come out with a fair outcome.
W14 - W15 Rendering + Final Editing
Animation Finalisation + Rendering
In the following two weeks, I needed to start the actual rendering task for all scenes.
Test render in PNG format
Test render in TIFF format
Character mesh distortion when setting keyframe in Maya


.jpg)


Comments
Post a Comment